How to Add Overlay in CapCut? Text, Image or Video- An Easy guide
Overlays are the graphical elements in the form of videos, images, or texts that are added on the top of a video to make it look captivating and enhance visual appeal. The word ‘overlay’ also conveys the meaning of adding a layer over. One of the most versatile features of CapCut is its ability to add unique overlays on videos. CapCut helps video creators to add creative overlays over their videos so that they can become attractive and add a feeling to the content. In the following guide, we’ll elaborate how to overlay in CapCut without any problem.
If you are a TikToker, beginner, or seasoned video editor, overlay effects in Capcut will make your videos stand out. This feature can be used for adding watermarks, stickers, and logos to the video. CapCut gives access to a wide range of unique overlays from simple texts to more advanced graphics and animations. Adding a video overlay in CapCut is very easy and simple.
What will you learn in this article?
- 1. What is the difference between CapCut Overlay and Green Screen?
- 2. How to add a text overlay on CapCut.?
- 3. How to add a video overlay on Capcut?
- 4. How to add a moving Overlay on CapCut?
- 5. How to add an image overlay on CapCut?
Although all these tutorials are made for CapCut mobile interface and the steps are exactly similar if you are using CapCut PC.
Difference between Overlay in Capcut and Green Screen?
Before we start on how to use overlays on videos, it is important to mention that the CapCut overlay feature and the green screen feature are two different things. Let us check what is the major difference between adding overlays and applying Green Screen on CapCut.
What is Overlay?
An overlay is an innovative feature that involves the addition of a layer of visual text, images, and videos on top of videos. It is a professional video editing skill used to highlight important information, add an element of fun, or simply make your video look more professional.
What is Green Screen?
CapCut Green screen feature is a background removal tool. Unlike the overlay feature, the green screen is used to remove the background of a video and add a creative background of your choice. So the green screen is related to removing or changing the background of a video.

How to easily do green screen on capcut?
How to Remove Background in CapCut within a few easy steps?
Now that we have seen the basic difference between overlay and green screen it is time to learn how to add an overlay on a video. We will look into the easy methods to add text, image, and video overlay individually. Although the tutorial is explained on the CapCut mobile application it also works similarly for CapCut PC.
How to Add a Text Overlay on CapCut?
Sometimes you want to add the name of the video or tell the audience what the video is about. CapCut text overlay feature quickly fulfills the need and provides a variety of text overlay options. Adding text overlay on the video engages the audience and reduces the bounce rate.
Make sure that you have the CapCut video editing app on your phone. If you don’t have you can find and install it from your Google play store. It is free. Along with this, you can also download CapCut Mod Apk to use CapCut premium features
Here is a step to step guide to adding the overlay to a video using CapCut.
1. Open CapCut App on your Phone
Open the CapCut app on your phone.
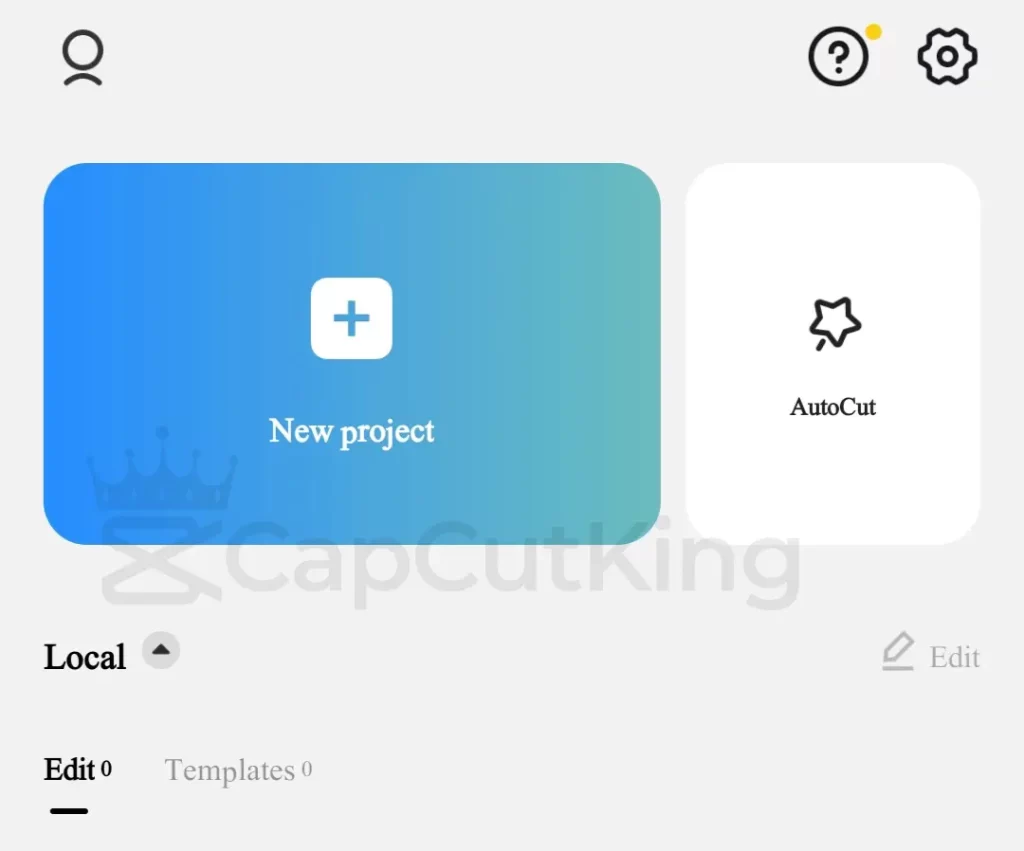
2. Launch New Project
Tap on ‘New Project’ to begin. It will take you to your gallery.
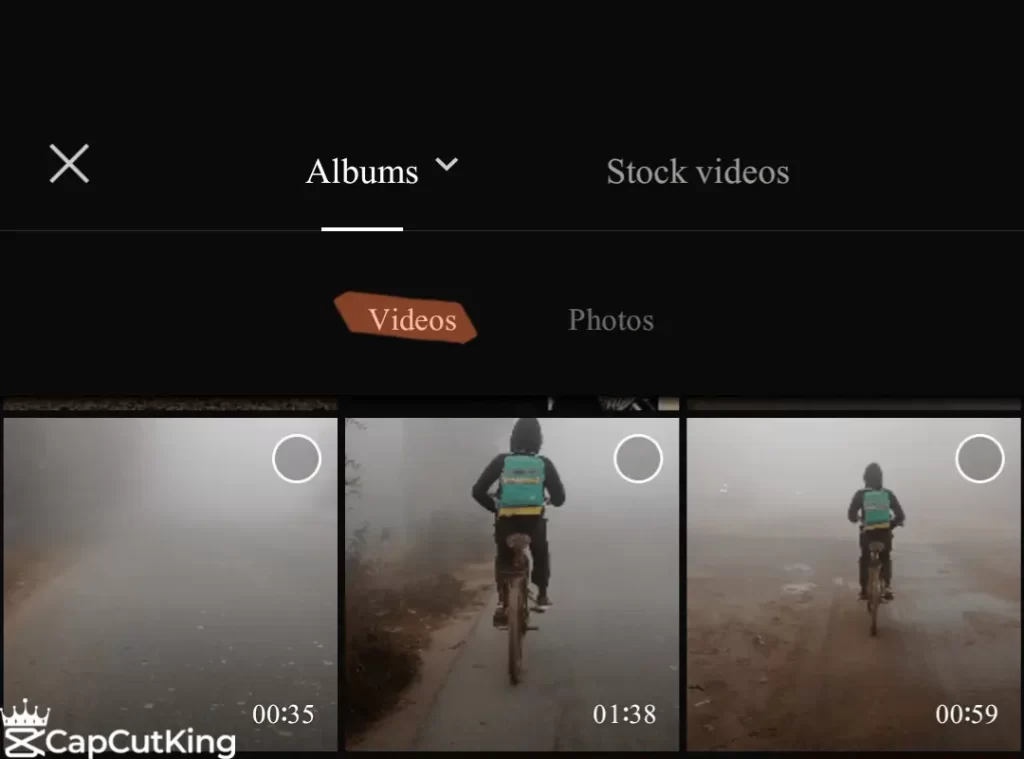
3. Choose the video
‘Select’ a video on which you want to add the text overlay in CapCut. Tap ‘Add’ to import the media. This video file will act as the background video.
4- Tap on Text button
Since you want to add text overlay in Capcut, after adding video, from the lower editing menu hit ‘Text.’

CapCut now offers six different options to add a text overlay from adding a simple text template to the experts’ and editors’ choice.

Following is the brief introduction of all the text overlay features in CapCut, and a brief guide on how to add text overlay in CapCut.
a- Add Text Overlay
Select ‘Add Text’ and write what you want to add.
CapCut ‘Add Text’ gives fascinating options to present your texts.

In ‘Fonts’ you have unlimited visual fonts to use. You can also style your text, add artistic effects, and animate it according to your need. It is a full package of brilliant features that give creative freedom to showcase your skills. CapCut offers beautiful fonts for more than 10 languages including Arabic, French, German, Italian, English and Urdu.
Along with choosing from a wide variety of fonts, you can also style your text, write your text in a bubble, give it the effect of your choice, and animate according to the mode of the video. All of these options are visible in the image posted above.
b- add Stickers as overlay
Sometimes you want to add some graphics like a 3-second timer before the video, stickers help you with it. Some useful labels in stickers are emoji to add expressions, arrows to point at something, and elements to use in Vlogs.

c- Add Auto Captions as overlay
Gone are the difficult days when you used to add manual captions to your video. CapCut has introduced a specialized artificial intelligence tool that enables auto-captioning of the video. The few widely spoken languages in the world have been included but it is just the beginning.

d- Add Text Templates as overlay
In this option, you can find many text templates used by professional creators, video editors, and filmmakers. Trending Templates, Social Media Specials, Vlog specifics, and whatnot.

To explain the procedure, we suppose that you have a video to post on social media.
5. Add CapCut Text Template Overlay:
Select the ‘Text Template’ and go to ‘Social Media.’ This option contains a list of buttons useful for social media videos. Choose a ‘Subscribe’ button. Drag the handlebar to the complete duration of your video.
6. Position the Overlay
Position the overlay at any place and adjust its size. You can position it anywhere because it is a transparent or translucent graphical element. So you can move it to any location on your video.
Thanks to CapCut, you can also edit the ‘Subscribe’ text by tapping on it and adding any text of your choice. This feature is only available on CapCut. When you are done with adding a text overlay, play your video again to check if you have done it as you wanted.
7. Export the Video:
‘Export’ the video from a download option available in the upper right corner and get the video in your Gallery. Share it on your Social Media and get noticed.
You can see how effortless it is to add text overlays in CapCut. Explore other options available in ‘Text’ to make your text overlays attractive.
How to Add a Video Overlay on CapCut?
Overlay in capcut can be used to add a video overlay on a background video. What if you want to add three video overlays together in CapCut? This is also very simple.
Here is a very simple guide to how you can do it. Make sure that you are in CapCut App.
1- Add New Project
Hit ‘New Project’ to begin. This will redirect you to your gallery.
2- Select Video
Select the video you want to use as background and tap ‘Add.’ The video will be imported and you can see it on your editing timeline.
3- Tap Overlay in CapCut
From the bottom workspace click on the ‘Overlay’ option.
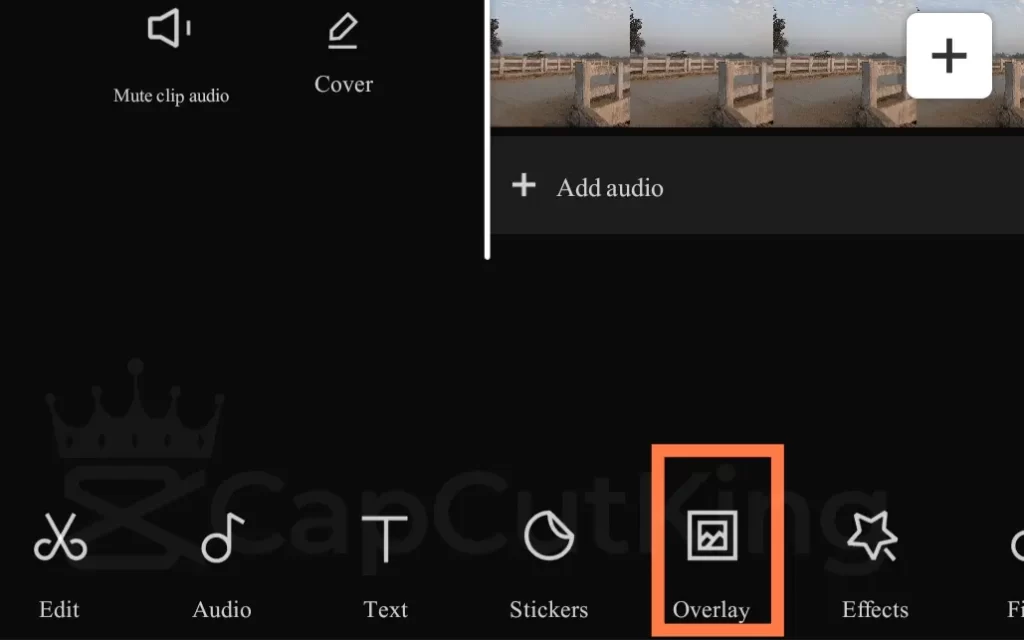
Tap ‘Add Overlay’ and it will ask you to add an overlay video from your gallery.
4- Add Video Overlay from gallery
‘Add’ a video of your choice that you want to overlay. Once the video is added you can position it anywhere on your video.
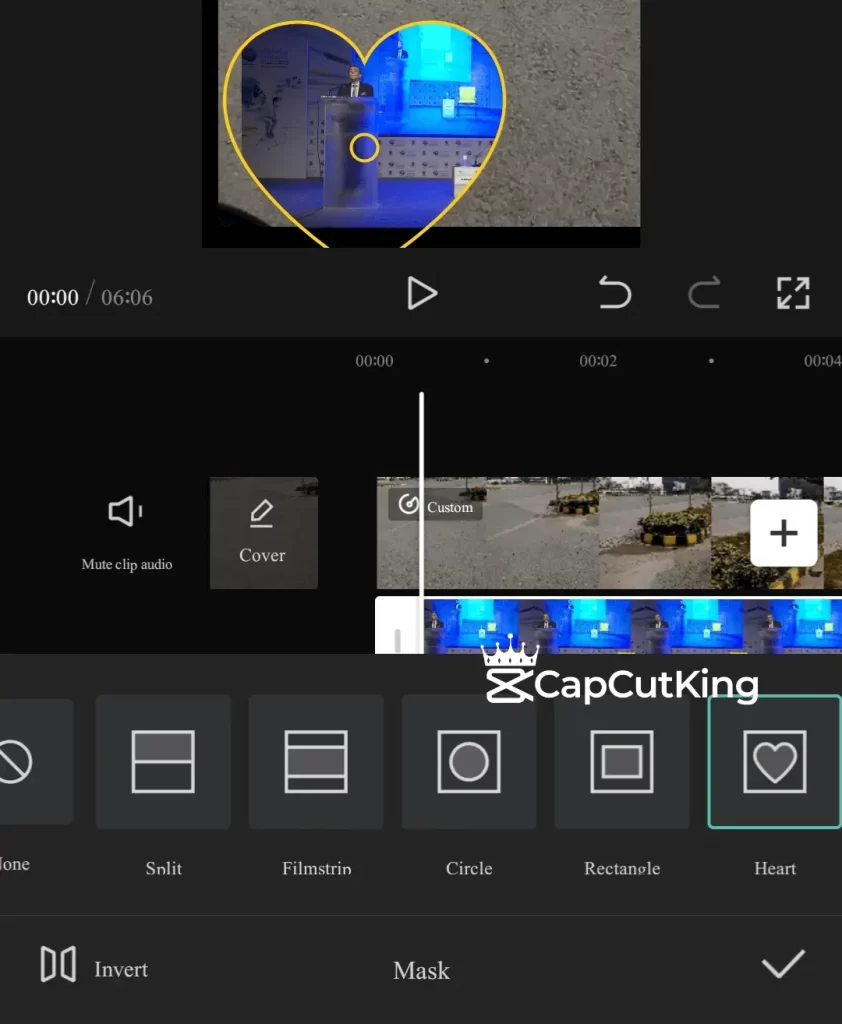
5- Apply Mask
Tap on the ‘Mask’ toolbar to apply the mask style of your choice. Mask styles can make your overlay look more creative and give order to overlays.
Similarly, you can add as many video overlays from the ‘Overlay’ option available in the editing menu and adjust them according to your choice. CapCut helps you to edit all videos in overlay individually.
6- Adjust overlay videos position
Adjust the position of your videos and get the desired overlay results.
Replay the video after editing. And find the ‘download’ option available in the upper right corner.
You have just experienced how CapCut ‘Overlay’ feature is easy to use. Video overlays are mostly used to show a comparison between two products’ qualities, rear and front mirror views of a car during vlogs, and much more.
How to Add Moving Overlays on CapCut
CapCut Moving overlays are the graphical element or a picture that moves across the screen in the video. Moving overlay tracks and follows the moving object. These are used to add visual interest, display important information and create a sense of movement in a video.
One of the most distinctive and innovative features of CapCut is the ‘Object Tracking’ tool. This recent technology tracks the moving object and enables the overlay to follow it. So as the object moves the overlay text or graphic moves across the screen with it. With CapCut’s user friendly interface adding a moving overlay on CapCut is a soothing breeze.
Here is a step to step tutorial for adding moving overlays to the video.
1- Hit New Project
Open CapCut App and tap ‘New Project’ to start the editing.
2- Add video
Add’ a video from your gallery and it will be uploaded to the CapCut editing timeline.
3- Tap on the Sticker in CapCut
Navigate the ‘Sticker’ option from the menu bar and select it.
4- Choose sticker type
From the list of different stickers, you have to choose one. It can be any thing from different stickers as shown in the image below to the picture of your choice.
If you want to add an image as sticker, find an option of a ‘Photo’ sticker at top left corner of the sticker window and click on it. Most probably it will be the first option on the list. This will direct you to your photo gallery.

5- Add moving overlay
Add’ the image or sticker that you want to add as a moving overlay.
6- Adjust size and position
Optimize its size to an acceptable level and adjust its position on the screen.
7- Tap on ‘Tracking’
Tap on the ‘sticker’ overlay and from the workspace different editing tools will appear. Slide left to find ‘Tracking’ and click on it.
8- Select the object for tracking in CapCut
Select the object on the video screen whose movement you want to track and place the circular pointer on it. In the following image, we have added an indicating hand as sticker and chose the yellow color of foot path as the object for tracking. Now in, in the video, this hand will move according to the yellow foot path.
9- Tap Start Tracking
Hit on ‘Start Tracking’ and let the CapCut do its magic. It might take a few moments to perform the action.
10- Save the video
Play the video again to confirm that you have done it right. You can also drag the moving overlay handlebar to the required duration. Download your video from the option given in the upper right corner and share it on your social media platform.
So here you have done in minutes what used to take many hours before CapCut. Using Object Tracking Technology is a skill and needs the expertise to add moving overlays on a video. You can easily master this skill while practicing.
How to add an image overlay to a video?
Sometimes the editors want an image to appear on the video to give some extra information about the video. You can simply do that by using the CapCut overlay feature. The process to add an image overlay is similar to adding a video overlay.
Let’s learn how to add an image overlay:
1. Launch a ‘New Project’ on CapCut.
2. ‘Add’ a background video on which you want to add an image overlay.
3. Tap on the ‘Overlay’ from the editing workspace.
4. Select ‘Images’ between the two options.
5. ‘Add’ an Image that will act as an overlay.
6. Adjust the size and position of the image on the video screen.
7. You can also edit and apply different filters to your image to make it eye-catching.
8. It is always wise to watch the final touch before exporting.
9. Export the video from the download option given in the upper right corner of the screen.
Just like other overlays, adding an image overlay is just a matter of a few stops. You can also add more than one image and edit them individually.
Frequently Asked Questions
Here, we have answered two most frequently asked questions about adding overlay in CapCut.
Conclusion:
With CapCut adding moving overlays has never been easier. Almost every graphical designer, filmmaker, and video editor use graphical overlay features in their projects. Now whether you are creating a tutorial, video message, or an advertisement, overlays can help you to make your videos truly stand out. You can also use the moving overlay feature to animate your overlays across the screen. CapCut has provided a seamless way of doing creative overlays so keep exploring and give your videos a professional touch.